How to update the PHP version in WordPress in 2022
February 3, 2022
It is always advisable to keep your WordPress website updated at all times to keep it running at its best. This includes updating the PHP version, the WordPress version, the theme you are using (if any) and the plugins you have installed. By doing this you can ensure that the performance and security of your website is not easily compromised.
If you are unsure about how to update the PHP version in WordPress in 2022, then you have come to the right place! In this article we will show you how to view and update the PHP version of your WordPress site.
How to know if your PHP version needs an update
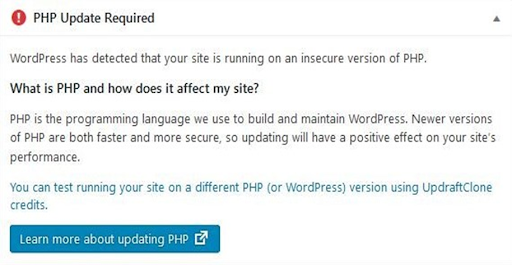
It’s really simple to know when your PHP version needs an update because you would see a “PHP update Required” message on your WordPress dashboard, as shown below. It is important to remove this warning message for a number of reasons that will be discussed later in the article. In order to fix this, there are a few easy steps you can follow to remove this warning message.
Why should you update the PHP version on WordPress?
WordPress is a free and open-source content management system (CMS) that is built using PHP. After you update the PHP version on WordPress, It will provide you with protection against any security vulnerabilities that can be harmful. PHP is a popular programming language, which makes it vulnerable to cyber-attacks; hence the latest security features are needed in order to stay protected. The latest version of PHP is more efficient and can boost performance compared to the older versions. Moreover, a notable speed increase and reduced memory usage would be achieved once the upgrade is done.
One thing to note is that the latest PHP version might not be compatible with your code hence it is important that you upgrade your WordPress theme and PHP version before you do anything else. Follow the steps below to update the PHP version.
Checking your current PHP version
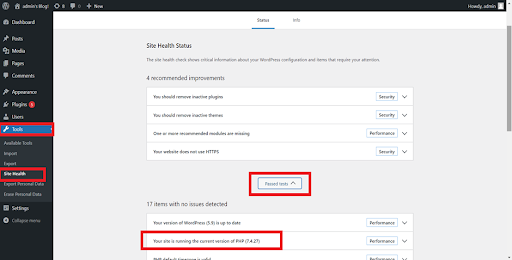
This step is optional. If you already know about your current PHP version, you can move to the next section; otherwise, follow along with us. Log in to WordPress and click on the ‘tools’ section on the left side of your screen. Under Tools, you will see a few options from where you need to select ‘Site health‘ and then ‘Passed tests‘. After selecting ‘Passed tests’, your PHP version should be visible, as shown in the picture below.
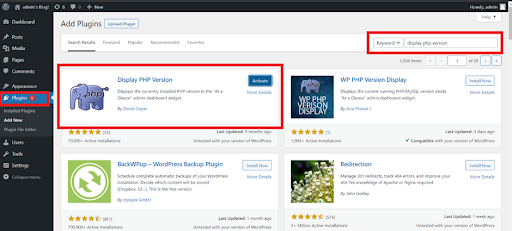
Your PHP version should be visible if you followed the steps correctly, but in case it didn’t work, there is another easy way too. Open your WordPress dashboard and click on ‘plugins’ that will be on the left side of your screen. Search for the ‘Display PHP Version’ plugin and install it. Don’t forget to press the ‘Activate’ button before moving forward.
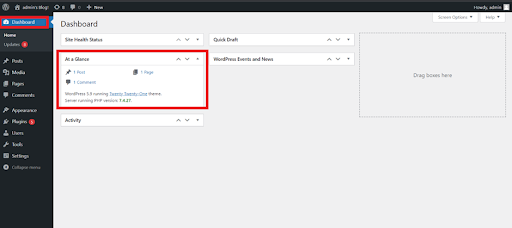
Once activated, click on ‘Dashboard’ on the left side of your screen. Upon clicking, you will see the ‘At a Glance’ section where your PHP version would be visible at the bottom. In the example shown below, the PHP version is 7.4.27, but in your case, it would be different. Now let’s update the PHP version.
How to update the PHP version using Bluehost hosting services?
In this article we’ll take Bluehost as an example but the steps are more or less similar for other hostings as well.
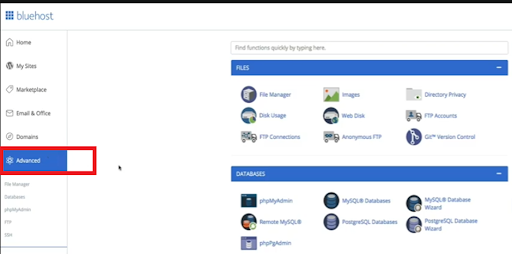
In order to update the PHP version, we need to access the cPanel. First, go to your Bluehost account dashboard, where you will see an ‘Advanced’ option on the left side of the screen. Clicking this would enable you to access the cPanel, as shown below.
Scroll down and you will find the ‘MultiPHP Manager’ option under the ‘Software’ section in your cPanel. Select the ‘MultiPHP Manager’ option and it will take you to a page where you can perform multiple configurations, including updating the PHP version.

Inside MultiPHP Manager, select the domain that you want to update the PHP version for. Then on your left, you will see the available PHP versions in a drop-down (as shown below). Click the drop-down and select the latest version of PHP. Don’t forget to press the ‘Apply’ button before proceeding ahead.

After you are done, a notification should pop up showing that the PHP version was updated successfully. To ensure that the PHP version was updated, go back to the WordPress ‘Tools’ section and then select the ‘Site Health’ option. Then click on the ‘Passed tests’ button to see the PHP version. Make sure it’s the latest version that you selected in the previous step. Also, test your website to make sure it’s working fine and there are no compatibility issues.
How to update the PHP version using other Hosting services?
To update the PHP version using other hosting services, some steps might differ but, in most cases, it will be similar in nature. Most hosting services will contain a ‘MultiPHP Manager’ icon in cPanel where there is an option to update the PHP version.
Here is the summary of the steps that you need to follow in order to update the PHP version:
- Access the cPanel from your hosting’s advance options
- Select the ‘MultiPHP Manager’ under the ‘Software’ section.
- Select the domain for which you want to change the PHP version.
- Once selected, choose the latest PHP version from the drop-down and click ‘Apply’.
- If the steps were followed correctly, a message would appear displaying that your PHP version was updated successfully.
We hope that this article will help you update the PHP version of your WordPress site. In case of any confusion, go through the article again or just read through the summary section at the end to ensure that you followed each step correctly.
About pubGENIUS
PubGENIUS specializes in providing customized and high quality web development solutions using the latest platforms, including WordPress. With a team of highly qualified and experienced developers, pubGENIUS has been building professional websites for its clients using best practices and following the top trends in the industry. If you are in need of a professional website, contact us today by clicking on the button below.